Maple Sugar
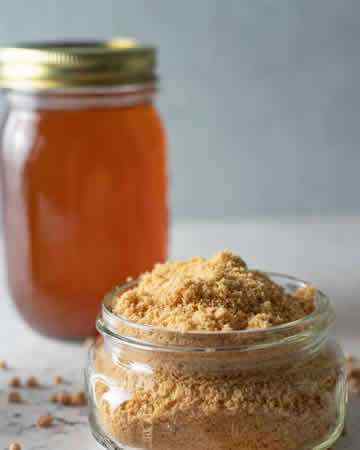 If you have ever tried to find maple sugar at the store, you know it is incredibly difficult to find. If you can find it, it is incredibly expensive ($25-$35 per pound) and may cost you your first-born. The thing is, there is really no reason to buy it when you can make it in just a few minutes at home. Use your own maple syrup or buy the pure stuff at the store. Don’t buy the cheap, popular brands that have high fructose corn syrup. It won’t work. This is really not a recipe, per se, it is more of a technique.
Maple Syrup Process:
Briefly, to make your own maple syrup, the sap of maple trees is collected in buckets using tree taps and cooked down to reduce the moisture content of the maple sap. It’s then poured through coffee filters or layers of cheesecloth to make the syrup clear.
This is a semi-involved process and can require some specialty equipment so we won’t get too deep with that. Maybe next year we’ll do an article on making the syrup.
After the syrup is made you need to . Once the syrup is bottled, you can proceed with making the sugar.
What is Maple Sugar?
It is just maple syrup that has been cooked down to reduce it’s water content. Then it is stirred with a wooden spoon vigorously until it forms a granulated sugar. It is basically the same process to make cane sugar.
Which Syrup To Use:
The grade of your syrup will affect the colour and flavour of the sugar. Maple syrup is graded into different classes. Typically the colour of the sap early in the season produce a lighter coloured syrup. The darker the syrup the stronger the taste. You will want a amber or dark coloured syrup to make sugar with the best flavour.
What You Need:
The best part is that you only need one ingredient. Pure maple syrup. Store bought or homemade.
How To Make It:
The thing about making granulated maple sugar is that the syrup needs to be heated to, according to Cornell University.
Did you know that water boils at different temperatures at different elevations? According to the USDA.
Pour syrup into a large pot with high sides. It will be boiled vigorously so make sure you have a large enough pot.
Boil over medium-high heat on your stove. Do not stir the syrup at this point. You can add a bit of butter to reduce the foam, but just make sure you use a deep pot.
You can see the colour change and how high the syrup is on the sides of the pot in the syrup.
Use a candy thermometer to check the temperature. Remember, it needs to be 45-50°F above the boiling point of water at your elevation. Use the link above to determine what temp that is. It should take between 15 and 30 minutes for the hot syrup to come to temp (don’t worry if it takes longer, you may just have the burner not as high). We are less than 1000 feet, so we take ours to about 260°F. Notice here how high the bubbling syrup has gotten in the pot.
Once you have reached that temp, turn off the heat or remove it from an electric burner to prevent scorching. You can either start to stir at this point or allow it to cool to about 200°F, according to the above referenced bulletin from Cornell.
We wait for it to cool a bit but at this stage the liquid is still very hot so wear an apron and heat resistant gloves to avoid burns. Also, work carefully to avoid splatters to your face.
If you stir by hand, it will take 15-20 minutes to granulate. As the syrup hardens it will become increasingly difficult to stir. We prefer pouring the liquid into the Kitchenaid mixer bowl, with the paddle attachment and letting the tool do all of the hard work. Use a low speed. I suggest doing a small quantity, like a cup or two of syrup. Larger quantities will require commercial mixers. See how thick it has gotten? At this stage it is hard to stir.
Once you’ve achieved granulated sugar, you can stop stirring. I allow the sugar to air dry overnight but you can eat it anytime now. Dry it in a in a low humidity environment (if your kitchen environment is higher humidity, dry it in the refrigerator spread out on rimmed sheets). Pour the sugar into a fine mesh strainer (stainless steel will be the best to use). This will remove larger chunks
Now you can run the large chunks through the food processor to try to break them down a bit. Sift the material that you processed again.
You will not be able to break up all of the chunks, but that is ok. This is called block sugar or hard sugar. You can use them in hot liquids or in recipes that are cooked like Maple BBQ Sauce.
If you have a courser sieve, you can run the chunks through that and then you can have sanding sugar too, for topping cookies and cakes.
Immediately after you are done using tools like spoons, bowls or pots, rinse them out with very hot water. This will save you a lot of cleanup time.
How to Make Powdered Maple Sugar:
If you would like a consistency more similar to powdered sugar for frostings and the like it’s incredibly easy.
Once you have your maple sugar all dried. Place your desired quantity of granulated sugar in your food processor. Process it for 3-5 minutes. To get that nice powdered consistency, add 1 Tbsp. of tapioca starch or arrowroot powder and process briefly to combine.
Store in an airtight container.
Makes 64 Tbsp.
Cook's Notes:
- Did you know that water boils at different temperatures at different elevations? You need to check the boiling point of water at your elevation. Just enter your zip code.
- Be sure to heat the syrup to the proper temperature. We are only 400 feet above sea level so water boils at 212°F (100°C) for us. So we heat syrup to about 260°F (125°C).
- Spread sugar out on a baking sheet and let it air dry for an hour or so, in a low humidity environment (February and March is perfect when the heat is on). Once the sugar has dried a bit, run some of the larger chunks through your food processor to break them up.
- One quart (1 L) of syrup yields about 2 lbs ( 1 kg), or one qt, of granulated sugar.
- Pour the sugar into an airtight container, we use mason jars with the two part lid and store at room temperature.
- Maple sugar is also paleo and vegan since it is unprocessed and contains only pure maple syrup.
- Why Make this Maple Sugar? First and foremost is the taste. The maple flavour really shines through with this sugar.
- Maple sugar is the most versatile product that you can make from maple syrup. It is perfectly shelf stable because it contains no water. Therefore, it can be stored at room temperature.
- Maple sugar will last indefinitely. It doesn’t mold or separate.
- Use it as a natural one to one substitute for white sugar or brown sugar in baking.
- It can even be reconstituted back to maple syrup and used to make maple confections such as maple candy.
- It’s a sustainable source of food. As long as there are sugar maples, then you’ll be able to make sugar.
- What is the Yield? One quart (1L) of syrup yields about 2 lbs ( 1 km), or one qt of granulated sugar.
Serving Suggestions:
- Use it on cereals, like oatmeal, grits and cream of rice
- Try it as a topping for yogurt, ice cream or cottage cheese.
- Sweeten tea, coffee, hot chocolate and other beverages.
- Make maple ice cream or pudding.
- Perfect to substitute for brown sugar in: Apple pie and other desserts like baked apples, apple bars, etc. are delicious with it. Pecan pie would be incredible.
- Make a delicious maple cheesecake.
- Maple-cream cheese frosting would be great on carrot cake.
- Try a Maple BBQ sauce. Delish.
- Use it to sweeten fruits like apples, raspberries, lemon, grapefruit and pears.
- Use it as fun holiday or hostess gifts. Your friends and family will be impressed and most of them have never even tried maple sugar.